Thursday, 20 December 2012

Biscotti


Yes, yes I made biscotti. It is possible, and my mother may think I am breaking the law creating an italian cookie so that it is vegan, but they are amazing and you'll love them. Me, myself, I am not very fond of biscotti, but I know 'lots of people love them, and since I am making cookies for christmas and my family, I will make cookies to please them. It is important to show your family that eating vegan can be tasty and full of variety. So, to make these cookies, you'll need....

1/2 cup margarine
3/4 cup sugar
1/4 cup soy milk
1/2 teaspoon vanilla extract
2 cups flour
1 1/2 teaspoons baking powder
1/4 teaspoon salt
1/3 cup of almonds cut in half

Heat the oven to 325 degrees. Add all the wet ingredients and the sugar together in one bowl, and the dry ingredients in another bowl, except for the almonds. Then, mix the two together and stir well. Finally add the almonds.


On a tray, lay the dough out and form it into a loaf about 1 inch thick. Bake this loaf for 30-35 minutes, and then take them out and let it cool, for at least 30 minutes. Then, with a knife slice it into 1/2 inch thick cookies, and lay them back onto the tray, and cook them for about 10 minutes, or until their crust is golden brown. Put them on a rack to cool and freeze until you serve them, taking them out one hour before you serve them.


Mmmm.....
Julia

Almond Butter Cookies

Yay!!!!! Christmas baking time!!!! Alright, get ready for a crazy amount of recipes and vegan goodness! I can tell you this, you will not only be receiving cookies and desserts, you will get recipes about gluten free lasagna and other apps that are yet to come!! I am sitting myself down and forcing myself to make sure I get all these recipes out to you! Starting now, with almond butter cookies.....mmm:)
You'll need...
1/2 cup of almond butter (raw if you want them lighter)
1/4 teaspoon almond extract
3 tablespoons canola oil
1 tablespoon agave nectar, or maple syrup if that's what you have
1/3 cup of sugar
1/4 cup brown sugar
1/4 cup soy milk
1 1/2 cups flour
1/2 teaspoon baking soda
1/4 cup Slivered almonds

Preheat the oven to 350 degrees
Mix together the almond butter, extract, oil, agave nectar, sugars, and soy milk together. Make sure that it is thoroughly mixed!! In another bowl, mix the flour and baking soda, then add it too your wet ingredients. Using a spoon, take a scoop to make a ball about 1 inch in diameter. Then take your slivered almonds and place a few in the middle.


Put the cookies in the oven for 8 minutes, but always put the timer on around 5 or 6 minutes to make sure they do not burn, since everyone's oven works a little differently. When they finish, put them on a cooling rack, and then freeze them in an air tight container until you want to serve them (that is if you want to keep them fresh because you are not serving them for a few days). Take them out one hour before serving them!

THIS is the beginning,
Julia

Monday, 17 December 2012

Gluten Free, Vegan Ravioli: Part 1


During the week, I am fully raw and do not eat any cooked food. On the weekends is usually when I have things that are cooked, along with all the nuts and seeds I care for. However, as time goes on, I have found that my craving for cooked food has lessened, to the point where after one meal of cooked food, all I want is to go back to my raw foods. It is weird, I know. Anyways, on the occasions that I do eat cooked food, I stay gluten free. Every year on Christmas Eve my family has people over, and my mom makes her homemade ravioli. This year I didn't want to miss out, so I have made some gluten free ravioli, that is vegan, to enjoy. This is only part one, since obviously the cooking and sauce will come at a later date, but I will try to get the recipe up before Christmas eve, however there will be no pictures until I actually make it. SORRY!

Anyways, to make about 25 medium sized ravioli you will need...

1 1/2 cups of corn flour (not bleached!!!) -- you can find this at Bulkbarn and most grocery stores
Soy milk (about 1 cup)
1/2 can of red kidney beans
1 tbsp dried parsley
1 tbsp oregano
1 tbsp garlic powder
1/2 tbsp black paper
1/2 a small onion
2 tbsp lemon juice
1tbsp agave or maple syrup

First, put your flour into a bowl and begin to add the soy milk at intervals of about 2 tbsp. Keep adding it as you mix until the flour begins to stick, but not too wet so that it is literally sticky , and can hold itself together. Then with your hands begin to work the dough on a floured surface- floured with cornflour- for about 2-3minutes. Then, separate your dough into 3 separate, even, balls, about 2 inches in diameter. Wrap them in cellophane and stick them in the fridge for 30 minutes.

Next, take the kidney beans and put them into a bowl. Using a masher, or a fork, but it will take longer, mash them up. Add in the spices, lemon juice, and agave/maple syrup. Chop up your onion into tiny cubes and add it to the beans. Give it a good mix and set it aside.
On your counter, put a layer of cellophane down. Take one of the balls of dough out of the fridge and place it on that layer. Then, grab another layer of cellophane and layer it on top, so the dough is in between. Roll out the dough so it makes a long thick strip. Try not to make it to thin, otherwise it will fall apart, since cornflour is very fragile, as you will be able to tell when you work it. Anyways, when you are satisfied with the strip, remove, carefully, the top layer of the cellophane. Then, take some of the kidney bean mixture and put little balls of it about 2 cm apart on the dough. Take the bottom layer of the cellophane and use it to flip the dough so it folds over the bean balls. Push it down so that the two dough layers stick, and you can even begin to push the dough down around the bean balls. Carefully remove the cellophane layer and place it back onto the counter.

      
Finish folding and pressing the layers together and then using a knife cut out the ravioli, leaving the extras behind. Try to make 8 with each set of dough. Place all of the ravioli on a tray on top of a non-stick sheet and freeze them overnight. Then place them in a bag and keep them there until you cook them.

Be awaiting for part 2!!
Julia

Sunday, 16 December 2012

Non Vegan Baking: Last Year's Standards


Okay, now begins the race. I have so much baking to do it is indescribable. Last year I baked TUNS of things, so now I have this reputation to uphold. What kind of reputation you might think? Well I have posted some of the things I made last year, and now, I have to do something just as amazing, but vegan.  These pictures here are of a cake that I made for last year's Christmas, and it was truly awesome, if I do say so myself. It had little houses on the size, covered with 'snow' (white chocolate). I had a chocolate sleigh, being pulled by chocolate reindeer, with chocolate presents falling out of the sleigh- all edible. Now to blow people out of the water this year :S

 This is my sleigh. It was made out of chocolate only, obviously I used both white and dark chocolate. Then I cut toblerone chocolate into little squares, and decorated them with chocolate.

 The cake itself was chocolate with chocolate raspberry icing. It was covered with blue fondant, and the houses and green trees on the bottom are made out of fondant. The white snow is white chocolate, and the brown trees are made out of regular dark chocolate.
 All the reindeer I made out of melted milk chocolate, then piped onto a tray and frozen. When they were frozen, I then took them out, put a toothpick on one of the legs, then covered it with chocolate up to the length of the leg so you could not see it. I froze it again then I stuck them into the cake. Yes, I made more reindeer then I needed, since obviously one or two broke when I was trying to stick them into the cake. And no you are not seeing things, rudolph has a red nose.


Fat Free Asparagus Risotto


When you find those recipes that are just perfect in everyday, life is great. This, is one of those recipes. It is 100% fat free!!! I love risotto and loved it before I was a vegan. I especially love asparagus risotto, but the recipe I used to make had tuns of fat and cream and cheese and badness. This recipe is vegan, fat free, guilt free, and delicious. It is also easy to make, so let's get started

To make enough for 6 people you'll need...

2 cups arborio rice
1000 ml/ 1 ltr of vegetable broth (preferably homemade)
4 shallots
3 cloves of garlic
20 asparagus
1 cup chopped mushrooms -type of your choice


First, in a large pan, put a little bit of water ( about 1/4 of a cup) in the pan and let it boil. While it heats up, chop up the 4 shallots and only 2 of your garlic cloves, then add it to the pan. Once the onions have visibly started to cook, add in the mushrooms, and a little more water- about 1/4 of a cup. Once the mushrooms shrink down, add in the rice; be sure to wash it before. Immediately after, pour in enough vegetable stock to cover the rice, and give it a stir. Watch the rice, and every time it absorbs all the veggie broth, add more to cover it, until you run out of broth

 While cooking the rice, in another pan or pot, fill it with water and let that come to a boil (enough water to cover your asparagus that will cook in it). When it has reached a boil, put the asparagus in and cook for 2 minutes, then drain it. Cut off all the heads of the asparagus, and then cut off about 1 inch of the stem of each one. Set the heads on pieces aside, then take the remaining asparagus and put it in a blender with 1 clove of garlic and about 1/4 cup of the vegetable broth.

When you run out of broth, now add in the asparagus broth and let it absorb it. At this point taste the rice; it should be firm but not crunchy. When you think it is done, add in the asparagus heads and pieces you set aside. Mix it all around, and enjoy!

Eat up,
Julia

Nut Olive Salad

One thing that you should include everyday: a salad. Greens are so important, and carry so much nutrients that missing out could be detrimental to your health. This is a great recipe, as it is easy to make and tastes awesome, if I do say so myself.

You'll need...
2 tbsp pine nuts
2 tbsp pumpkin seeds
2 tbsp sunflower seeds
1/4 cup chopped olives (type of your choice)
1/4 cup raisons
3 cups of mixed greens or romaine lettuce
1/4 cup lemon juice
2 tbsp agave nectar or maple syrup if that's only what you have

First, in a bowl, put your greens, seeds, nuts, olives, and raisons. Then in a little bowl or cup, mix together your agave and lemon juice. Pour the dressing on top of the salad and give it a good mix! Done!! Yay so easy!


Enjoy,
Julia

Raw Pizza


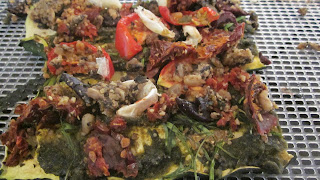
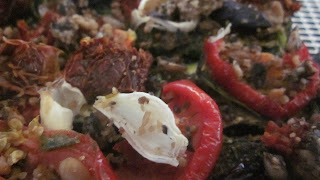
I know, I haven't posted in a very long time, so this is very long overdue. I promise though, this next week will be filled with so many recipes, because of corse, it is Christmas!! Yay! I'll be doing 'lots of baking, and cooking too, and I will try to share every recipe I do. This recipe here I made a long time ago, so it is about time I posted something about it. It tastes really great and I hope you all enjoy it!

To make this raw pizza, you will need...
1/4 of a batch of pesto (see link below)
1/4 batch sunflower olive cheese (see link below)
4 zucchini
1/2 cup baby tomatoes
6 pearl onions
1/4 cup sun dried tomatoes (you can make your own in a dehydrator or you can buy them)
1/3 cup red olives


First, cut the zucchini into strips using a mandolin slicer; you can do it manually to if you do not have one, but your slices may be thicker and you may end up needing more zucchinis. Once sliced, lay them on your non-stick dehydrator sheet on a dehydrator tray. Layer them on top of each other until there is no gaps (this is your crust). You can make it a square pizza or a circular one, by laying them so they form the shape you want. Then, carefully spread the pesto on top. Cut the baby tomatoes into halves, as well as the pearl onions. Pit and cut the olives into pieces and slice the sun dried tomatoes too. Sprinkle your toppings on evenly, then sprinkle on the sunflower olive cheese.

Put the tray into the dehydrator at 105 degrees and leave it for 10-12 hours, or until the zucchini have stuck together, the tomatoes are dried out, and the onions are dried out.

Cut it into slices and enjoy,
Julia

Sunflower olive cheese:http://cookingtothebeat.blogspot.ca/2012/10/sunflower-olive-cheese.html
Pesto: http://cookingtothebeat.blogspot.ca/2012/10/zucchini-pesto-pasta.html

P.S. variation for this recipe: make them bite sized!!! Just place the zucchini down separate and put the toppings on each piece!